Keras 实现的性别年龄检测 (已并入颜值服务)

github  https://github.com/yu4u/age-gender-estimation

先试用下训练好的权重文件

将 demo.py 的80行改动了一下,用以识别图片

if 1==1:
    #for img in yield_images():
        img = cv2.imread("test.jpg")

113行 改动用以保存结果

        cv2.imwrite("test1.jpg",img)
        #cv2.imshow("result", img)
        #key = cv2.waitKey(30)
        #while true:
        #    if key == 27:
        #        break

效果还可以,等有空训练下再改成一个service。原权重的训练集基本都是老外。

另一个Tensorflow的实现:Age Gender Estimate TF 一个tensorflow 识别年龄的demo

整合进了颜值server

代码比较乱,凑活先用着吧,

全部代码请移步 Github  https://github.com/endpang/xindong/blob/master/facerank/server.py

权重文件超过了 github100m的限制。大家去源地址下载吧。

https://github.com/yu4u/age-gender-estimation/releases/download/v0.5/weights.18-4.06.hdf5

__author__ = 'pangzhiwei'

import cv2
import dlib
import numpy as np
import math
import itertools
from sklearn.externals import joblib
from sklearn import decomposition
import bottle
from bottle import request
import urllib.request
import json
from wide_resnet import WideResNet


def facialRatio(points):
	x1 = points[0]
	y1 = points[1]
	x2 = points[2]
	y2 = points[3]
	x3 = points[4]
	y3 = points[5]
	x4 = points[6]
	y4 = points[7]
	dist1 = math.sqrt((x1-x2)**2 + (y1-y2)**2)
	dist2 = math.sqrt((x3-x4)**2 + (y3-y4)**2)
	ratio = dist1/dist2
	return ratio


def generateFeatures(pointIndices1, pointIndices2, pointIndices3, pointIndices4, allLandmarkCoordinates):
	size = allLandmarkCoordinates.shape
	if len(size) > 1:
		allFeatures = np.zeros((size[0], len(pointIndices1)))
		for x in range(0, size[0]):
			landmarkCoordinates = allLandmarkCoordinates[x, :]
			ratios = []
			for i in range(0, len(pointIndices1)):
				x1 = landmarkCoordinates[2*(pointIndices1[i]-1)]
				y1 = landmarkCoordinates[2*pointIndices1[i] - 1]
				x2 = landmarkCoordinates[2*(pointIndices2[i]-1)]
				y2 = landmarkCoordinates[2*pointIndices2[i] - 1]
				x3 = landmarkCoordinates[2*(pointIndices3[i]-1)]
				y3 = landmarkCoordinates[2*pointIndices3[i] - 1]
				x4 = landmarkCoordinates[2*(pointIndices4[i]-1)]
				y4 = landmarkCoordinates[2*pointIndices4[i] - 1]
				points = [x1, y1, x2, y2, x3, y3, x4, y4]
				ratios.append(facialRatio(points))
			allFeatures[x, :] = np.asarray(ratios)
	else:
		allFeatures = np.zeros((1, len(pointIndices1)))
		landmarkCoordinates = allLandmarkCoordinates
		ratios = []
		for i in range(0, len(pointIndices1)):
			x1 = landmarkCoordinates[2*(pointIndices1[i]-1)]
			y1 = landmarkCoordinates[2*pointIndices1[i] - 1]
			x2 = landmarkCoordinates[2*(pointIndices2[i]-1)]
			y2 = landmarkCoordinates[2*pointIndices2[i] - 1]
			x3 = landmarkCoordinates[2*(pointIndices3[i]-1)]
			y3 = landmarkCoordinates[2*pointIndices3[i] - 1]
			x4 = landmarkCoordinates[2*(pointIndices4[i]-1)]
			y4 = landmarkCoordinates[2*pointIndices4[i] - 1]
			points = [x1, y1, x2, y2, x3, y3, x4, y4]
			ratios.append(facialRatio(points))
		allFeatures[0, :] = np.asarray(ratios)
	return allFeatures


def generateAllFeatures(allLandmarkCoordinates):
	a = [18, 22, 23, 27, 37, 40, 43, 46, 28, 32, 34, 36, 5, 9, 13, 49, 55, 52, 58]
	combinations = itertools.combinations(a, 4)
	i = 0
	pointIndices1 = []
	pointIndices2 = []
	pointIndices3 = []
	pointIndices4 = []
	for combination in combinations:
		pointIndices1.append(combination[0])
		pointIndices2.append(combination[1])
		pointIndices3.append(combination[2])
		pointIndices4.append(combination[3])
		i = i+1
		pointIndices1.append(combination[0])
		pointIndices2.append(combination[2])
		pointIndices3.append(combination[1])
		pointIndices4.append(combination[3])
		i = i+1
		pointIndices1.append(combination[0])
		pointIndices2.append(combination[3])
		pointIndices3.append(combination[1])
		pointIndices4.append(combination[2])
		i = i+1
	return generateFeatures(pointIndices1, pointIndices2, pointIndices3, pointIndices4, allLandmarkCoordinates)


def fetch_face_pic(face,predictor):
    rects = detector(face, 1)
    img_h, img_w, _ = np.shape(face)
    faces = np.empty((len(rects), img_size, img_size, 3))
    detected = rects
    img = face
    lables = []
    if len(detected) > 0:
        for i, d in enumerate(detected):
            x1, y1, x2, y2, w, h = d.left(), d.top(), d.right() + 1, d.bottom() + 1, d.width(), d.height()
            xw1 = max(int(x1 - 0.4 * w), 0)
            yw1 = max(int(y1 - 0.4 * h), 0)
            xw2 = min(int(x2 + 0.4 * w), img_w - 1)
            yw2 = min(int(y2 + 0.4 * h), img_h - 1)
            cv2.rectangle(img, (x1, y1), (x2, y2), (255, 0, 0), 2)
            # cv2.rectangle(img, (xw1, yw1), (xw2, yw2), (255, 0, 0), 2)
            faces[i, :, :, :] = cv2.resize(img[yw1:yw2 + 1, xw1:xw2 + 1, :], (img_size, img_size))

        # predict ages and genders of the detected faces
        results = model.predict(faces)
        predicted_genders = results[0]
        ages = np.arange(0, 101).reshape(101, 1)
        predicted_ages = results[1].dot(ages).flatten()

        # draw results
        for i, d in enumerate(detected):
            label = [predicted_ages[i],
                                    "F" if predicted_genders[i][0] > 0.5 else "M"]
            #print(label)
            lables.append(label)
            #draw_label(img, (d.left(), d.top()), label)
    arrs = []
    face_arr = []
    for faces in range(len(rects)):
        # 使用predictor进行人脸关键点识别
        #print(rects[faces])
        landmarks = np.matrix([[p.x, p.y] for p in predictor(face, rects[faces]).parts()])
        #face_img = face.copy()
        # 使用enumerate函数遍历序列中的元素以及它们的下标
        arr = []

        for idx, point in enumerate(landmarks):
            arr = np.append(arr,point[0,0])
            arr = np.append(arr,point[0,1])
            #strs += str(point[0, 0]) + ','  + str(point[0, 1]) + ','
            #pos = (point[0, 0], point[0, 1])
            #print(point)
            #f.write(str(point[0, 0]))
            #f.write(',')
            #f.write(str(point[0, 1]))
            #f.write(',')
            #f.write('\n')
        if len(arrs) == 0:
            arrs = [arr]
        else:
            arrs = np.concatenate((arrs,[arr]),axis=0)
        f = rects[faces]
        [x1,x2,y1,y2]=[f.left(),f.right(),f.top(),f.bottom()]
        a = [[x1,x2,y1,y2]]
        if len(face_arr) == 0:
            face_arr = a
        else:
            face_arr = np.concatenate((face_arr,a) ,axis=0)
    return arrs,face_arr,lables

def predict(my_features):
    predictions = []
    for i in range(len(my_features)):
        feature = my_features[i, :]
        feature_transfer = pca.transform(feature.reshape(1, -1))
        predictions.append(pre_model.predict(feature_transfer).tolist())
        print(i)
    '''
    if len(my_features.shape) > 1:
        for i in range(len(my_features)):
            feature = my_features[i, :]
            feature_transfer = pca.transform(feature.reshape(1, -1))
            predictions.append(pre_model.predict(feature_transfer))
        print('照片中的人颜值得分依次为(满分为5分):')
        k = 1
        for pre in predictions:
            print('第%d个人:' % k, end='')
            print(str(pre)+'分')
            k += 1
    else:
        feature = my_features
        feature_transfer = pca.transform(feature.reshape(1, -1))
        predictions.append(pre_model.predict(feature_transfer))
        print('照片中的人颜值得分为(满分为5分):')
        k = 1
        for pre in predictions:
            print(str(pre)+'分')
            k += 1
    '''
    return predictions

PREDICTOR_PATH = './model/shape_predictor_68_face_landmarks.dat'
detector = dlib.get_frontal_face_detector()
# 使用官方提供的模型构建特征提取器
predictor = dlib.shape_predictor(PREDICTOR_PATH)
pre_model = joblib.load('./model/face_rating.pkl')
features = np.loadtxt('./data/features_ALL.txt', delimiter=',')
pca = decomposition.PCA(n_components=20)
pca.fit(features)

weight_file = "./model/weights.18-4.06.hdf5"
img_size = 64
model = WideResNet(img_size, depth=16, k=8)()
model.load_weights(weight_file)

@bottle.route('/find', method='GET')
def do_find():
    w = request.query.get("url")
    #print(w)
    resp = urllib.request.urlopen(w)
    image = np.asarray(bytearray(resp.read()),dtype="uint8")
    image = cv2.imdecode(image,cv2.IMREAD_COLOR)

    arrs,faces,lables = fetch_face_pic(image,predictor)
    print("arrs:",arrs)
    if len(arrs) < 1:
        return ""
    if len(arrs) == 1:
        my_features = generateAllFeatures(arrs[0])
    else:
        my_features = generateAllFeatures(arrs)
    if len(my_features.shape) > 1:
        predictions = predict(my_features,)
        print(faces)
        print(predictions)
        # print(type(predictions))
        print(type(faces))
        a2 = np.array([1,2])
        if type(faces) == type(a2):
            print("is")
            faces = faces.tolist()
        result =[
            faces,predictions,image.shape,lables
        ]
    #print(image)
    print(faces)
    return json.dumps(result)


bottle.run(host='0.0.0.0', port=8888)

效果

测试图片
Face Rank 基于dlib的颜值计算服务

带年龄的版本 Keras 实现的性别年龄检测

本文不再更新,请移步上面链接的文章。

__author__ = 'pangzhiwei'

import cv2
import dlib
import numpy as np
import math
import itertools
from sklearn.externals import joblib
from sklearn import decomposition
import bottle
from bottle import request
import urllib.request
import json


def facialRatio(points):
	x1 = points[0]
	y1 = points[1]
	x2 = points[2]
	y2 = points[3]
	x3 = points[4]
	y3 = points[5]
	x4 = points[6]
	y4 = points[7]
	dist1 = math.sqrt((x1-x2)**2 + (y1-y2)**2)
	dist2 = math.sqrt((x3-x4)**2 + (y3-y4)**2)
	ratio = dist1/dist2
	return ratio


def generateFeatures(pointIndices1, pointIndices2, pointIndices3, pointIndices4, allLandmarkCoordinates):
	size = allLandmarkCoordinates.shape
	if len(size) > 1:
		allFeatures = np.zeros((size[0], len(pointIndices1)))
		for x in range(0, size[0]):
			landmarkCoordinates = allLandmarkCoordinates[x, :]
			ratios = []
			for i in range(0, len(pointIndices1)):
				x1 = landmarkCoordinates[2*(pointIndices1[i]-1)]
				y1 = landmarkCoordinates[2*pointIndices1[i] - 1]
				x2 = landmarkCoordinates[2*(pointIndices2[i]-1)]
				y2 = landmarkCoordinates[2*pointIndices2[i] - 1]
				x3 = landmarkCoordinates[2*(pointIndices3[i]-1)]
				y3 = landmarkCoordinates[2*pointIndices3[i] - 1]
				x4 = landmarkCoordinates[2*(pointIndices4[i]-1)]
				y4 = landmarkCoordinates[2*pointIndices4[i] - 1]
				points = [x1, y1, x2, y2, x3, y3, x4, y4]
				ratios.append(facialRatio(points))
			allFeatures[x, :] = np.asarray(ratios)
	else:
		allFeatures = np.zeros((1, len(pointIndices1)))
		landmarkCoordinates = allLandmarkCoordinates
		ratios = []
		for i in range(0, len(pointIndices1)):
			x1 = landmarkCoordinates[2*(pointIndices1[i]-1)]
			y1 = landmarkCoordinates[2*pointIndices1[i] - 1]
			x2 = landmarkCoordinates[2*(pointIndices2[i]-1)]
			y2 = landmarkCoordinates[2*pointIndices2[i] - 1]
			x3 = landmarkCoordinates[2*(pointIndices3[i]-1)]
			y3 = landmarkCoordinates[2*pointIndices3[i] - 1]
			x4 = landmarkCoordinates[2*(pointIndices4[i]-1)]
			y4 = landmarkCoordinates[2*pointIndices4[i] - 1]
			points = [x1, y1, x2, y2, x3, y3, x4, y4]
			ratios.append(facialRatio(points))
		allFeatures[0, :] = np.asarray(ratios)
	return allFeatures


def generateAllFeatures(allLandmarkCoordinates):
	a = [18, 22, 23, 27, 37, 40, 43, 46, 28, 32, 34, 36, 5, 9, 13, 49, 55, 52, 58]
	combinations = itertools.combinations(a, 4)
	i = 0
	pointIndices1 = []
	pointIndices2 = []
	pointIndices3 = []
	pointIndices4 = []
	for combination in combinations:
		pointIndices1.append(combination[0])
		pointIndices2.append(combination[1])
		pointIndices3.append(combination[2])
		pointIndices4.append(combination[3])
		i = i+1
		pointIndices1.append(combination[0])
		pointIndices2.append(combination[2])
		pointIndices3.append(combination[1])
		pointIndices4.append(combination[3])
		i = i+1
		pointIndices1.append(combination[0])
		pointIndices2.append(combination[3])
		pointIndices3.append(combination[1])
		pointIndices4.append(combination[2])
		i = i+1
	return generateFeatures(pointIndices1, pointIndices2, pointIndices3, pointIndices4, allLandmarkCoordinates)


def fetch_face_pic(face,predictor):
    rects = detector(face, 1)
    #str = ""
    #strs = ""
    arrs = []
    face_arr = []
    for faces in range(len(rects)):
        # 使用predictor进行人脸关键点识别
        #print(rects[faces])
        landmarks = np.matrix([[p.x, p.y] for p in predictor(face, rects[faces]).parts()])
        #face_img = face.copy()
        # 使用enumerate函数遍历序列中的元素以及它们的下标
        arr = []

        for idx, point in enumerate(landmarks):
            arr = np.append(arr,point[0,0])
            arr = np.append(arr,point[0,1])
            #strs += str(point[0, 0]) + ','  + str(point[0, 1]) + ','
            #pos = (point[0, 0], point[0, 1])
            #print(point)
            #f.write(str(point[0, 0]))
            #f.write(',')
            #f.write(str(point[0, 1]))
            #f.write(',')
            #f.write('\n')
        if len(arrs) == 0:
            arrs = [arr]
        else:
            arrs = np.concatenate((arrs,[arr]),axis=0)
        f = rects[faces]
        [x1,x2,y1,y2]=[f.left(),f.right(),f.top(),f.bottom()]
        a = [[x1,x2,y1,y2]]
        if len(face_arr) == 0:
            face_arr = a
        else:
            face_arr = np.concatenate((face_arr,a) ,axis=0)
    return arrs,face_arr

def predict(my_features):
    predictions = []
    for i in range(len(my_features)):
        feature = my_features[i, :]
        feature_transfer = pca.transform(feature.reshape(1, -1))
        predictions.append(pre_model.predict(feature_transfer).tolist())
        print(i)
    '''
    if len(my_features.shape) > 1:
        for i in range(len(my_features)):
            feature = my_features[i, :]
            feature_transfer = pca.transform(feature.reshape(1, -1))
            predictions.append(pre_model.predict(feature_transfer))
        print('照片中的人颜值得分依次为(满分为5分):')
        k = 1
        for pre in predictions:
            print('第%d个人:' % k, end='')
            print(str(pre)+'分')
            k += 1
    else:
        feature = my_features
        feature_transfer = pca.transform(feature.reshape(1, -1))
        predictions.append(pre_model.predict(feature_transfer))
        print('照片中的人颜值得分为(满分为5分):')
        k = 1
        for pre in predictions:
            print(str(pre)+'分')
            k += 1
    '''
    return predictions

PREDICTOR_PATH = './model/shape_predictor_68_face_landmarks.dat'
detector = dlib.get_frontal_face_detector()
# 使用官方提供的模型构建特征提取器
predictor = dlib.shape_predictor(PREDICTOR_PATH)
pre_model = joblib.load('./model/face_rating.pkl')
features = np.loadtxt('./data/features_ALL.txt', delimiter=',')
pca = decomposition.PCA(n_components=20)
pca.fit(features)


@bottle.route('/find', method='GET')
def do_find():
    w = request.query.get("url")
    #print(w)
    resp = urllib.request.urlopen(w)
    image = np.asarray(bytearray(resp.read()),dtype="uint8")
    image = cv2.imdecode(image,cv2.IMREAD_COLOR)
    arrs,faces = fetch_face_pic(image,predictor)
    print(arrs)
    my_features = generateAllFeatures(arrs)
    if len(my_features.shape) > 1:
        predictions = predict(my_features,)
        print(faces)
        print(predictions)
        # print(type(predictions))
        result =[
            faces.tolist(),predictions
        ]
    #print(image)
    print(faces)
    return json.dumps(result)


bottle.run(host='0.0.0.0', port=8888)

最新代码及model 文件见 https://github.com/endpang/xindong

opencv 人脸识别并返回置信度的服务

import cv2
import numpy as np
import os
import bottle
def fetch_face_pic(img,face_cascade):
        # 将图像灰度化
        gray = cv2.cvtColor(img, cv2.COLOR_BGR2GRAY)
        # 人脸检测
        faces,rl,wl = face_cascade.detectMultiScale3(gray,scaleFactor=1.1,
                minNeighbors=3,
                minSize=(30, 30),
                flags = cv2.CASCADE_SCALE_IMAGE,
                outputRejectLevels = True
                )
        #输出分数最高的
        ol = 0

        for i,(x,y,w,h) in enumerate(faces):

            if wl[i][0] > ol:
                crop = img[y:y+h, x:x+w] # 使用切片操作直接提取感兴趣的区域
                print(wl[i][0],ol,x,y,w,h)
                ol = wl[i][0]
        return crop


face_cascade = cv2.CascadeClassifier('/root/girl/opencv-master/data/haarcascades/haarcascade_frontalface_default.xml')

@bottle.route('/find/<w>', method='GET')
def do_find(w):
    jaffe_pic = '/web/maps.cc/public/girl/img/' + w
    img = cv2.imread(jaffe_pic)
    crop = fetch_face_pic(img,face_cascade)
    if crop is not None:
        cv2.imwrite("/web/maps.cc/public/girl/thumb/"+w,crop)
        return w
    return ""

bottle.run(host='0.0.0.0', port=8080)

分割识别的web服务

将mask-rcnn 打造成一个 webserver

因线上服务器没有装显卡,需用 autossh 反向隧道的方式,将显卡封装成服务提供给服务器使用。

服务器端用 php 封了一个壳。

本地用python 的 bottle 将 mask-rcnn 封装成了webserver

代码参见 github : https://github.com/endpang/mask-rcnn-webserver

参考

用docker 部署一个 web 应用  https://zhuanlan.zhihu.com/p/26418829?utm_medium=social&utm_source=weibo

OpenCV iOS 开发笔记

GITHUB:https://github.com/endpang/opencvdemo

实现了寻找边缘和自定义上色。

  • 添加opencv.framework后编译报错
Expected identifier

解决办法

把 NO 改为
NO_EXPOSURE_COMPENSATOR = 0
  • opencv 依赖的库
libc++.tbd
AVFoundation.framework
CoreImage.framework
CoreGraphics.framework
QuartzCore.framework
Accelerate.framework

//摄像头
CoreVideo.framework
CoreMedia.framework
AssetsLibrary.framework
#import "ViewController.h"
#import <opencv2/opencv.hpp>
#import <opencv2/videoio/cap_ios.h>

//@interface ViewController ()


@interface ViewController ()<CvVideoCameraDelegate>{
    UIImageView *cameraView;
    CvVideoCamera *videoCamera;
}
@end

@implementation ViewController

- (void)viewDidLoad {
    [super viewDidLoad];
    // Do any additional setup after loading the view, typically from a nib.
    cameraView = [[UIImageView alloc] initWithFrame:self.view.frame];
    [self.view addSubview:cameraView];
    
    videoCamera = [[CvVideoCamera alloc] initWithParentView:cameraView];
    videoCamera.defaultAVCaptureDevicePosition = AVCaptureDevicePositionFront;
    videoCamera.defaultAVCaptureSessionPreset = AVCaptureSessionPreset1920x1080;
    videoCamera.defaultAVCaptureVideoOrientation = AVCaptureVideoOrientationPortrait;
    videoCamera.defaultFPS = 60;
    videoCamera.grayscaleMode = NO;
    videoCamera.delegate = self;
}
- (void)viewDidAppear:(BOOL)animated {
    [super viewDidAppear:animated];
    [videoCamera start];
}

- (void)viewWillDisappear:(BOOL)animated {
    [super viewWillDisappear:animated];
    [videoCamera stop];
}

#pragma mark -  CvVideoCameraDelegate
- (void)processImage:(cv::Mat&)image {
    //在这儿我们将要添加图形处理的代码
    cv::Mat image_copy;
    //首先将图片由RGBA转成GRAY
    cv::cvtColor(image, image_copy, cv::COLOR_BGR2GRAY);
    //反转图片
    cv::bitwise_not(image_copy, image_copy);
    //将处理后的图片赋值给image,用来显示
    cv::cvtColor(image_copy, image, cv::COLOR_GRAY2BGR);
}


- (void)didReceiveMemoryWarning {
    [super didReceiveMemoryWarning];
    // Dispose of any resources that can be recreated.
}

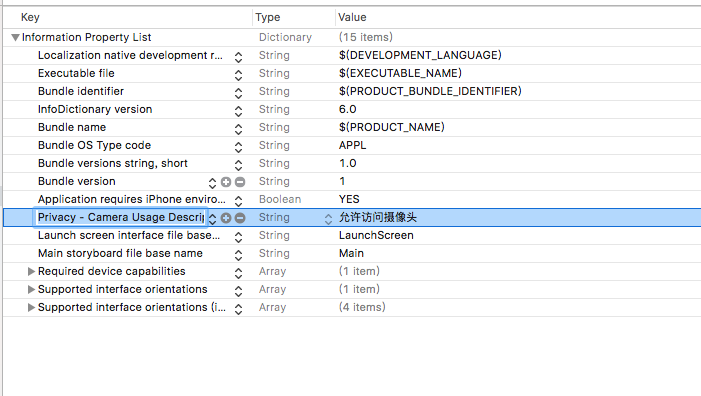
plist 里加入  Privacy – Camera Usage Description

服务器端代码

8000 端口的服务是 https://github.com/lllyasviel/style2paints

k.png 是一张纯白色 png

<?php
/**/
//print_R($_FILES);
$imgname = $_FILES['upload1']['name'];
$tmp = $_FILES['upload1']['tmp_name'];
$filepath = 'photo/';
if(move_uploaded_file($tmp,$filepath.$imgname)){
    //echo "上传成功";
    my_post($filepath.$imgname);
}else{
    echo "上传失败";
}
//*/
//my_post("photo/20180118172008.png");
function my_post($filename){
    $url = "http://172.18.100.205:8000/paint";

    $headers[] = 'Origin: http://172.18.100.205:8000';
    $headers[] = 'Accept-Encoding: gzip, deflate';
    $headers[] = 'Accept-Language: zh-CN,zh;q=0.9,en;q=0.8';
    $headers[] = 'User-Agent: Mozilla/5.0 (Macintosh; Intel Mac OS X 10_12_6) AppleWebKit/537.36 (KHTML, like Gecko) Chrome/63.0.3239.132 Safari/537.36';
    $headers[] = 'Content-Type: application/x-www-form-urlencoded;';
    $headers[] = 'Accept: */*';
    $headers[] = 'Referer: http://172.18.100.205:8000/';
    $headers[] = 'Cookie: scale=2; style=photo; noise=2';
    $headers[] = 'Connection: keep-alive';
    //$post_data = array ("username" => "bob","key" => "12345");
    $ch = curl_init();
    $post_data = [];
    $post_data["sketchDenoise"] = "true";
    $post_data["resultDenoise"] = "true";
    $post_data["algrithom"] = "quality";
    $post_data["method"] = "colorize";
    $post_data["sketchID"] = "new";
    $post_data["referenceID"] = "no";
    //$b6 = "data%3Aimage%2Fpng%3Bbase64%2C";
    $b5 = "data:image/jpeg;base64,";
    $b6 = "data:image/png;base64,";
    //echo base64_encode($b6);
    $post_data["hint"] = $b6.base64_encode(file_get_contents("k.png"));
    $post_data["reference"] ="null" ;//$b6.base64_encode(file_get_contents("108_copy.png"));
    //$post_data["reference"] = null;
    $post_data["sketch"] = $b6.base64_encode(file_get_contents($filename));
    curl_setopt($ch, CURLOPT_HTTPHEADER, $headers);
    curl_setopt($ch, CURLOPT_URL, $url);
    curl_setopt($ch, CURLOPT_RETURNTRANSFER, 1);
    // post数据
    curl_setopt($ch, CURLOPT_POST, 1);
    // post的变
    //echo $post_data["sketch"];
    //print_R(http_build_query($post_data));
    curl_setopt($ch, CURLOPT_POSTFIELDS, http_build_query($post_data));

    $output = curl_exec($ch);
    $out_array = explode('*',$output);

    curl_close($ch);
    echo "http://172.18.100.205:8000/results/".$out_array[0].".jpg";
    //print_R($output);
}

No module named ‘skimage’   (python3)

apt install . python3-skimage

OpenCV 去雾

import cv2
import numpy as np
  
def zmMinFilterGray(src, r=7):
    '''最小值滤波,r是滤波器半径'''
    '''if r <= 0:
        return src
    h, w = src.shape[:2]
    I = src
    res = np.minimum(I  , I[[0]+range(h-1)  , :])
    res = np.minimum(res, I[range(1,h)+[h-1], :])
    I = res
    res = np.minimum(I  , I[:, [0]+range(w-1)])
    res = np.minimum(res, I[:, range(1,w)+[w-1]])
    return zmMinFilterGray(res, r-1)'''
    return cv2.erode(src, np.ones((2*r+1, 2*r+1)))                      #使用opencv的erode函数更高效
def guidedfilter(I, p, r, eps):
    '''引导滤波,直接参考网上的matlab代码'''
    height, width = I.shape
    m_I = cv2.boxFilter(I, -1, (r,r))
    m_p = cv2.boxFilter(p, -1, (r,r))
    m_Ip = cv2.boxFilter(I*p, -1, (r,r))
    cov_Ip = m_Ip-m_I*m_p
  
    m_II = cv2.boxFilter(I*I, -1, (r,r))
    var_I = m_II-m_I*m_I
  
    a = cov_Ip/(var_I+eps)
    b = m_p-a*m_I
  
    m_a = cv2.boxFilter(a, -1, (r,r))
    m_b = cv2.boxFilter(b, -1, (r,r))
    return m_a*I+m_b
  
def getV1(m, r, eps, w, maxV1):  #输入rgb图像,值范围[0,1]
    '''计算大气遮罩图像V1和光照值A, V1 = 1-t/A'''
    V1 = np.min(m,2)                                         #得到暗通道图像
    V1 = guidedfilter(V1, zmMinFilterGray(V1,7), r, eps)     #使用引导滤波优化
    bins = 2000
    ht = np.histogram(V1, bins)                              #计算大气光照A
    d = np.cumsum(ht[0])/float(V1.size)
    for lmax in range(bins-1, 0, -1):
        if d[lmax]<=0.999:
            break
    A  = np.mean(m,2)[V1>=ht[1][lmax]].max()
          
    V1 = np.minimum(V1*w, maxV1)                   #对值范围进行限制
      
    return V1,A
  
def deHaze(m, r=81, eps=0.001, w=0.95, maxV1=0.80, bGamma=False):
    Y = np.zeros(m.shape)
    V1,A = getV1(m, r, eps, w, maxV1)               #得到遮罩图像和大气光照
    for k in range(3):
        Y[:,:,k] = (m[:,:,k]-V1)/(1-V1/A)           #颜色校正
    Y =  np.clip(Y, 0, 1)
    if bGamma:
        Y = Y**(np.log(0.5)/np.log(Y.mean()))       #gamma校正,默认不进行该操作
    return Y
  
if __name__ == '__main__':
    m = deHaze(cv2.imread('land.jpg')/255.0)*255
    cv2.imwrite('defog.jpg', m)

转自:https://www.cnblogs.com/zmshy2128/p/6128033.html

视频去雾

if __name__ == '__main__':
    cap = cv2.VideoCapture("1.mp4")
    while(1):
        ret, frame = cap.read()
        m = deHaze(frame/255.0)  #注意,这里不要乘 255
        cv2.imshow("yuan",frame)
        cv2.imshow("this",m)
        if cv2.waitKey(1) & 0xFF == ord('q'):
             break
cap.release()
cv2.destroyAllWindows()
安吉
感谢 @静静静姐姐 的照片

OpenCV 实时景深

#coding=utf-8
import cv2
import numpy as np
import usb.core
import usb.backend.libusb1
import requests
import time
from matplotlib import pyplot as plt

cap = cv2.VideoCapture(1)
backend = usb.backend.libusb1.get_backend(find_library=lambda x: "/usr/lib/libusb-1.0.so")
 # 
dev = usb.core.find(idVendor=0x18e3, idProduct=0x5031, backend=backend)
dev.ctrl_transfer(0x21,0x01,0x0800,0x0600,[0x50,0xff])
dev.ctrl_transfer(0x21,0x01,0x0f00,0x0600,[0x00,0xf6])
dev.ctrl_transfer(0x21,0x01,0x0800,0x0600,[0x25,0x00])
dev.ctrl_transfer(0x21,0x01,0x0800,0x0600,[0x5f,0xfe])
dev.ctrl_transfer(0x21,0x01,0x0f00,0x0600,[0x00,0x03])
dev.ctrl_transfer(0x21,0x01,0x0f00,0x0600,[0x00,0x02])
dev.ctrl_transfer(0x21,0x01,0x0f00,0x0600,[0x00,0x12])
dev.ctrl_transfer(0x21,0x01,0x0f00,0x0600,[0x00,0x04])
dev.ctrl_transfer(0x21,0x01,0x0800,0x0600,[0x76,0xc3])
dev.ctrl_transfer(0x21,0x01,0x0a00,0x0600,[4,0x00])   

firstFrame = None
window_size = 0 
while(1):
        ret, frame = cap.read()
        frame = cv2.resize(frame, (1280, 480), interpolation=cv2.CV_8SC1)
        #cv2.cvtColor(frame, frame, cv2.COLOR_BGR2GRAY);
        frame_left_old = frame[0:480,0:640] 
        frame_left = cv2.cvtColor(frame_left_old,  cv2.COLOR_BGR2GRAY);
        frame_right_old = frame[0:480,640:1280]
        frame_right = cv2.cvtColor(frame_right_old,  cv2.COLOR_BGR2GRAY);
        #stereo = cv2.StereoBM_create(numDisparities=32, blockSize=15)
        stereo = cv2.StereoSGBM_create(minDisparity = 16,
            numDisparities = 64,
            blockSize = 16,
            P1 = 8*3*window_size**2,
            P2 = 32*3*window_size**2,
            disp12MaxDiff = 1,
            uniquenessRatio = 10,
            speckleWindowSize = 100,
            speckleRange = 32
        )
        disparity = stereo.compute(frame_left,frame_right)
        disp = cv2.normalize(disparity, disparity, alpha=0, beta=255, norm_type=cv2.NORM_MINMAX, dtype=cv2.CV_8U)
        cv2.imshow("h",disp)
        #plt.imshow(disparity,'gray')
        #plt.show()
        if cv2.waitKey(1) & 0xFF == ord('q'):
                break
cap.release()
cv2.destroyAllWindows()

最新文件在 : https://github.com/endpang/driverless

disparity.py   图片调参
disparity_video.py   视频取图调参

这两个文件是调节摄像头的。其实应该用严格标定,懒得麻烦的,可以用这个工具简单表定下。

left_or_right.py  测试

其中minDisparity是控制匹配搜索的第一个参数,代表了匹配搜苏从哪里开始,numberOfDisparities表示最大搜索视差数uniquenessRatio表示匹配功能函数

OpenCV 动态检测

10000 是检测灵敏度阈值,根据需要调整灵敏度。

#coding=utf-8
import cv2
import numpy as np
import usb.core
import usb.backend.libusb1
import requests
import time

cap = cv2.VideoCapture(1)
backend = usb.backend.libusb1.get_backend(find_library=lambda x: "/usr/lib/libusb-1.0.so")
 # 
dev = usb.core.find(idVendor=0x18e3, idProduct=0x5031, backend=backend)
dev.ctrl_transfer(0x21,0x01,0x0800,0x0600,[0x50,0xff])
dev.ctrl_transfer(0x21,0x01,0x0f00,0x0600,[0x00,0xf6])
dev.ctrl_transfer(0x21,0x01,0x0800,0x0600,[0x25,0x00])
dev.ctrl_transfer(0x21,0x01,0x0800,0x0600,[0x5f,0xfe])
dev.ctrl_transfer(0x21,0x01,0x0f00,0x0600,[0x00,0x03])
dev.ctrl_transfer(0x21,0x01,0x0f00,0x0600,[0x00,0x02])
dev.ctrl_transfer(0x21,0x01,0x0f00,0x0600,[0x00,0x12])
dev.ctrl_transfer(0x21,0x01,0x0f00,0x0600,[0x00,0x04])
dev.ctrl_transfer(0x21,0x01,0x0800,0x0600,[0x76,0xc3])
dev.ctrl_transfer(0x21,0x01,0x0a00,0x0600,[4,0x00])   

firstFrame = None

while(1):
        ret, frame = cap.read()
        frame = cv2.resize(frame, (1280, 480), interpolation=cv2.INTER_CUBIC)
        frame_left = frame[0:480,0:640]
        frame_right = frame[0:480,640:1280]
        gray = cv2.cvtColor(frame_left, cv2.COLOR_BGR2GRAY)         
        gray = cv2.GaussianBlur(gray, (21, 21), 0)
        if firstFrame is None:  
            firstFrame = gray
            continue
    
        frameDelta = cv2.absdiff(firstFrame, gray)
        thresh = cv2.threshold(frameDelta, 25, 255, cv2.THRESH_BINARY)[1] 
        thresh = cv2.dilate(thresh, None, iterations=2)
        (_, cnts, _) = cv2.findContours(thresh.copy(), cv2.RETR_CCOMP, cv2.CHAIN_APPROX_SIMPLE)
       
        g = frame.copy()
        ii = 0
        for c in cnts:
            if cv2.contourArea(c) < 10000:
                continue
            ii = 1
            #(x, y, w, h) = cv2.boundingRect(c)
            #print (cv2.contourArea(c))
            #cv2.rectangle(g, (x, y), (x + w, y + h), (0, 255, 0), 2)
        if ii == 1:
            url = "http://br.bj.oupeng.com:10080"
            t = time.time()
            cv2.imwrite("./"+str(t)+".jpg", g)
            files = {'file123':(str(t)+'.png',open("./"+str(t)+".jpg",'rb'))}
            data = {'time',str(t)}
            r = requests.post(url, files=files )#, data = data)
            print(r.text)
        cv2.imshow("br",g)
        firstFrame = gray.copy() 
        ##去掉绿色通道,生成红蓝图
        #zeros = np.zeros(frame_2.shape[:2], dtype = "uint8")
        #merged = cv2.merge([b,zeros,r2])  
        #cv2.imshow("br",merged)  
        
        if cv2.waitKey(1) & 0xFF == ord('q'):
                break
cap.release()
cv2.destroyAllWindows()

TOF python 实现

看了下  lighthouse ,图漾景深摄像头的原理。似乎是用 tof(time of fly) 和 光流实现的。

模拟一下

import cv2
import numpy as np
cap = cv2.VideoCapture(0)

ret, frame1 = cap.read()
prvs = cv2.cvtColor(frame1,cv2.COLOR_BGR2GRAY)
hsv = np.zeros_like(frame1)
hsv[...,1] = 255

while(1):
    ret, frame2 = cap.read()
    next = cv2.cvtColor(frame2,cv2.COLOR_BGR2GRAY)

    flow = cv2.calcOpticalFlowFarneback(prvs,next, None, 0.5, 3, 15, 3, 5, 1.2, 0)

    mag, ang = cv2.cartToPolar(flow[...,0], flow[...,1])
    hsv[...,0] = ang*180/np.pi/2
    hsv[...,2] = cv2.normalize(mag,None,0,255,cv2.NORM_MINMAX)
    rgb = cv2.cvtColor(hsv,cv2.COLOR_HSV2BGR)

    cv2.imshow('frame2',rgb)
    k = cv2.waitKey(30) & 0xff
    if k == 27:
        break
    elif k == ord('s'):
        cv2.imwrite('opticalfb.png',frame2)
        cv2.imwrite('opticalhsv.png',rgb)
    prvs = next

cap.release()
cv2.destroyAllWindows()

效果:

视频地址:https://m.youtube.com/watch?v=5jur04bJDkM&feature=youtu.be

Opencv 双目摄像头 转 红蓝3D (python)

买来的便宜板子的红蓝模式是   红青。。。手头又没有红青眼镜。

本着能动手绝不伸手的原则(其实买个眼镜也就10几块钱。)自己搞之。

摄像头显示左右分割

一直觉得左右分割会有个 split 类似的函数,找了很久也没找到。。。

结果发现,就是这么简单,惊喜不惊喜。。。。

import cv2
import numpy as np

cap = cv2.VideoCapture(0)
while(1):
        ret, frame = cap.read()
        frame_new = frame[0:400,0:400]
        frame_2 = frame[400:800,0:400]
        cv2.imshow("capture",frame_new)
        cv2.imshow("capture2",frame_2)
        if cv2.waitKey(1) & 0xFF == ord('q'):
                break
cap.release()
cv2.destroyAllWindows()

最终的代码

实现的原理,就是合并两个摄像头的红,蓝部分,并去掉绿色部分。

摄像头像素太渣,看不出效果。

import cv2
import numpy as np
import usb.core
import usb.backend.libusb1
cap = cv2.VideoCapture(1)
backend = usb.backend.libusb1.get_backend(find_library=lambda x: "/usr/lib/libusb-1.0.so")
 # 
dev = usb.core.find(idVendor=0x18e3, idProduct=0x5031, backend=backend)
dev.ctrl_transfer(0x21,0x01,0x0800,0x0600,[0x50,0xff])
dev.ctrl_transfer(0x21,0x01,0x0f00,0x0600,[0x00,0xf6])
dev.ctrl_transfer(0x21,0x01,0x0800,0x0600,[0x25,0x00])
dev.ctrl_transfer(0x21,0x01,0x0800,0x0600,[0x5f,0xfe])
dev.ctrl_transfer(0x21,0x01,0x0f00,0x0600,[0x00,0x03])
dev.ctrl_transfer(0x21,0x01,0x0f00,0x0600,[0x00,0x02])
dev.ctrl_transfer(0x21,0x01,0x0f00,0x0600,[0x00,0x12])
dev.ctrl_transfer(0x21,0x01,0x0f00,0x0600,[0x00,0x04])
dev.ctrl_transfer(0x21,0x01,0x0800,0x0600,[0x76,0xc3])
dev.ctrl_transfer(0x21,0x01,0x0a00,0x0600,[4,0x00])   

while(1):
        ret, frame = cap.read()
        frame = cv2.resize(frame, (1280, 480), interpolation=cv2.INTER_CUBIC)
        frame_new = frame[0:480,0:640]
        b, g, r = cv2.split(frame_new)
        frame_2 = frame[0:480,640:1280]
        b2, g2, r2 = cv2.split(frame_2)
        zeros = np.zeros(frame_2.shape[:2], dtype = "uint8")
        merged = cv2.merge([b,zeros,r2]) 
        cv2.imshow("br",merged)  
        if cv2.waitKey(1) & 0xFF == ord('q'):
                break
cap.release()
cv2.destroyAllWindows()