微信小程序实践 – 陌生人地图

共享位置信息的小程序。

3.21 实现动态加载 markers

3.22 增加login & 通过服务器获取 openid

3.23 从服务器获取最新位置并更新 marker 位置

坑:

很多 function 里,需要 bind(this)。

map 的 translateMarker 方法,在动态加载 marker 时,需要等大概10秒以上才能成功找到markerId ,因为这个问题被坑了好久。


微信小程序代码:https://github.com/endpang/maps.cc

服务端代码

get.php

<?php

$redis = new Redis();
$redis->connect('127.0.0.1', 6688);
$redis->select(4);
/**/
file_put_contents("xx.log","[get]".json_encode($_REQUEST).PHP_EOL,FILE_APPEND);
$_REQUEST["id"] = 1;
$_REQUEST["latitude"] = round($_REQUEST["latitude"],4);
$_REQUEST["longitude"] = round($_REQUEST["longitude"],4);
$result = [
    'status' => 1,
    'count' => 1,
    'friend' => [$_REQUEST],
];
file_put_contents("xx.log","[response]".json_encode($result).PHP_EOL,FILE_APPEND);
//*/
echo json_encode($result);

test.php

<?php

$redis = new Redis();
$redis->connect('127.0.0.1', 6688);
$redis->select(4);
/**
$result = [
    'status' => 1,
    'userInfo' => "test",
];
//*/
$file = file_get_contents("https://api.weixin.qq.com/sns/jscode2session?appid=xxx&secret=xxx&js_code=".$_REQUEST['code']."&grant_type=authorization_code");
$user_array = json_decode($file,true);
//file_put_contents("xx.log",$file);
if(!empty($user_array["openid"])){
    $result["status"] = 1;
    $result["userInfo"]["openid"] = $user_array["openid"];
    $redis->set("user_".$user_array["openid"],$file);
}
echo json_encode($result);

PHP微信机器人

github https://github.com/HanSon/vbot
https://github.com/HanSon/my-vbot

修改文件 Example.php

$this->config =  $default_config;//array_merge($default_config, $this->config);

修改了一个文件,以实现收到文字回复笔画的功能
MessageHandler.php

如需主动发起消息请安装swoole,并修改config文件。

pecl install swoole

<?php

namespace Hanson\MyVbot;

use Hanson\MyVbot\Handlers\Contact\ColleagueGroup;
use Hanson\MyVbot\Handlers\Contact\ExperienceGroup;
use Hanson\MyVbot\Handlers\Contact\FeedbackGroup;
use Hanson\MyVbot\Handlers\Contact\Hanson;
use Hanson\MyVbot\Handlers\Type\RecallType;
use Hanson\MyVbot\Handlers\Type\TextType;
use Hanson\Vbot\Contact\Friends;
use Hanson\Vbot\Contact\Groups;
use Hanson\Vbot\Contact\Members;

use Hanson\Vbot\Message\Emoticon;
use Hanson\Vbot\Message\Text;
use Illuminate\Support\Collection;

class MessageHandler
{
    public static function messageHandler(Collection $message)
    {
        /** @var Friends $friends */
        $friends = vbot('friends');

        /** @var Members $members */
        $members = vbot('members');

        /** @var Groups $groups */
        $groups = vbot('groups');

        Hanson::messageHandler($message, $friends, $groups);
        ColleagueGroup::messageHandler($message, $friends, $groups);
        FeedbackGroup::messageHandler($message, $friends, $groups);
        ExperienceGroup::messageHandler($message, $friends, $groups);

        TextType::messageHandler($message, $friends, $groups);
        RecallType::messageHandler($message);

        if ($message['type'] === 'new_friend') {
            Text::send($message['from']['UserName'], '客官,等你很久了!感谢跟 vbot 交朋友,如果可以帮我点个star,谢谢了!https://github.com/HanSon/vbot');
            $groups->addMember($groups->getUsernameByNickname('Vbot 体验群'), $message['from']['UserName']);
            Text::send($message['from']['UserName'], '现在拉你进去vbot的测试群,进去后为了避免轰炸记得设置免骚扰哦!如果被不小心踢出群,跟我说声“拉我”我就会拉你进群的了。');
        }

        if ($message['type'] === 'emoticon' && random_int(0, 1)) {
            Emoticon::sendRandom($message['from']['UserName']);
        }

        // @todo
        if ($message['type'] === 'official') {
            vbot('console')->log('收到公众号消息:'.$message['title'].$message['description'].
                $message['app'].$message['url']);
        }

        if ($message['type'] === 'request_friend') {
            vbot('console')->log('收到好友申请:'.$message['info']['Content'].$message['avatar']);
            if (in_array($message['info']['Content'], ['echo', 'print_r', 'var_dump', 'print'])) {
                $friends->approve($message);
            }
        }
        //print_r($message);
        $re = 0;
        if($message["fromType"] == "Friend"){
            $nick = $message['from']['NickName'];
            $re = 1;
        }

        if($message["fromType"] == "Group"){
            $nick = $message['sender']['NickName'];
            if(@$message['isAt']){
                $re = 1;
            }
        }
        if($re ==1 ){

            $zi = mb_substr($message["message"],0,1,'utf-8');
            $uni = self::unicode_encode($zi);


            $var = trim($uni);
            $len = strlen($var)-1;
            $las = $var{$len};
            $url = "http://www.shufaji.com/datafile/bd/gif/".$las."/".$uni.".gif";
            //Text::send($message['from']['UserName'], "@".$nick." ".$url);
            if(!is_file(__DIR__."/img/".$uni.'.gif')){

                $img = @file_get_contents($url);

                if(!empty($img)){
                    file_put_contents(__DIR__."/img/".$uni.'.gif',$img);
                    Emoticon::send($message['from']['UserName'], __DIR__."/img/".$uni.".gif");

                }else{
                    Text::send($message['from']['UserName'], "@".$nick." 找不到这个字的笔顺".$url);
                }
            }else{
                Emoticon::send($message['from']['UserName'], __DIR__."/img/".$uni.".gif");
            }
        }


    }
    private static function unicode_encode($name)
    {
        $name = iconv('UTF-8', 'UCS-2', $name);
        $len = strlen($name);
        $str = '';
        for ($i = 0; $i < $len - 1; $i = $i + 2)
        {
            $c = $name[$i];
            $c2 = $name[$i + 1];
            if (ord($c) > 0)
            {    // 两个字节的文字
                $s1 = base_convert(ord($c), 10, 16);
                $s2 = base_convert(ord($c2), 10, 16);

                if(ord($c) < 16){
                    $s1 = "0".$s1;
                }
                if(ord($c2) < 16){
                    $s2 = "0".$s2;
                }
                $str .= $s1 . $s2;
            }
            else
            {
                $str .= $c2;
            }

        }
        return $str;
    }
}

itchat 调试完毕后,开始折腾聊天的server

https://ask.julyedu.com/question/7410

首先准备好  torch 环境,然后安装 nn,rnn,async

sudo ~/torch/install/bin/luarocks install nn
sudo ~/torch/install/bin/luarocks install rnn
sudo ~/torch/install/bin/luarocks install async penlight cutorch cunn

下载程序和语料

git clone --recursive https://github.com/rustcbf/chatbot-zh-torch7 #代码
git clone --recursive https://github.com/rustcbf/dgk_lost_conv #语料
git clone --recursive https://github.com/chenb67/neuralconvo #以上两个在此源码进行改进,可作为参考

将 dgk_lost_conv 里的  xiaohuangji50w_fenciA.zip 解压放到外层目录

th train.lua –cuda –dataset 5000 –hiddenSize 100

报错

-- Epoch 1 / 30

/root/torch/install/bin/luajit: ./seq2seq.lua:50: attempt to call field 'recursiveCopy' (a nil value)
stack traceback:
	./seq2seq.lua:50: in function 'forwardConnect'
	./seq2seq.lua:67: in function 'train'
	train.lua:90: in main chunk
	[C]: in function 'dofile'
	/root/torch/install/lib/luarocks/rocks/trepl/scm-1/bin/th:150: in main chunk
	[C]: at 0x00405d50

修改 seq2seq.lua 如下 (50 – 70 行间)

function Seq2Seq:forwardConnect(inputSeqLen)
  self.decoderLSTM.userPrevOutput =
    --nn.rnn.recursiveCopy(self.decoderLSTM.userPrevOutput, self.encoderLSTM.outputs[inputSeqLen])
    nn.utils.recursiveCopy(self.decoderLSTM.userPrevOutput, self.encoderLSTM.outputs[inputSeqLen])
  self.decoderLSTM.userPrevCell =
    nn.utils.recursiveCopy(self.decoderLSTM.userPrevCell, self.encoderLSTM.cells[inputSeqLen])
end

--[[ Backward coupling: Copy decoder gradients to encoder LSTM ]]--
function Seq2Seq:backwardConnect()
  if(self.encoderLSTM.userNextGradCell ~= nil) then
    self.encoderLSTM.userNextGradCell =
      nn.utils.recursiveCopy(self.encoderLSTM.userNextGradCell, self.decoderLSTM.userGradPrevCell)
  end
  if(self.encoderLSTM.gradPrevOutput ~= nil) then
    self.encoderLSTM.gradPrevOutput =
      nn.utils.recursiveCopy(self.encoderLSTM.gradPrevOutput, self.decoderLSTM.userGradPrevOutput)
  end
end

训练之,1080ti 一轮大概 两个多小时。。。 30轮估计需要70小时。妇女节后见了。

eval.lua 的时候报错,不明所以,先放弃这个了,试试别的。

/root/torch/install/bin/luajit: /root/torch/install/share/lua/5.1/nn/Container.lua:67:
In 3 module of nn.Sequential:
/root/torch/install/share/lua/5.1/torch/Tensor.lua:466: Wrong size for view. Input size: 100. Output size: 6561
stack traceback:
 [C]: in function 'error'
 /root/torch/install/share/lua/5.1/torch/Tensor.lua:466: in function 'view'
 /root/torch/install/share/lua/5.1/rnn/utils.lua:191: in function 'recursiveZeroMask'
 /root/torch/install/share/lua/5.1/rnn/MaskZero.lua:37: in function 'updateOutput'
 /root/torch/install/share/lua/5.1/rnn/Recursor.lua:13: in function '_updateOutput'
 /root/torch/install/share/lua/5.1/rnn/AbstractRecurrent.lua:50: in function 'updateOutput'
 /root/torch/install/share/lua/5.1/rnn/Sequencer.lua:53: in function </root/torch/install/share/lua/5.1/rnn/Sequencer.lua:34>
 [C]: in function 'xpcall'
 /root/torch/install/share/lua/5.1/nn/Container.lua:63: in function 'rethrowErrors'
 /root/torch/install/share/lua/5.1/nn/Sequential.lua:44: in function 'forward'
 ./seq2seq.lua:115: in function 'eval'
 eval.lua:90: in function 'say'
 eval.lua:105: in main chunk
 [C]: in function 'dofile'
 /root/torch/install/lib/luarocks/rocks/trepl/scm-1/bin/th:150: in main chunk
 [C]: at 0x00405d50

WARNING: If you see a stack trace below, it doesn't point to the place where this error occurred. Please use only the one above.
stack traceback:
 [C]: in function 'error'
 /root/torch/install/share/lua/5.1/nn/Container.lua:67: in function 'rethrowErrors'
 /root/torch/install/share/lua/5.1/nn/Sequential.lua:44: in function 'forward'
 ./seq2seq.lua:115: in function 'eval'
 eval.lua:90: in function 'say'
 eval.lua:105: in main chunk
 [C]: in function 'dofile'
 /root/torch/install/lib/luarocks/rocks/trepl/scm-1/bin/th:150: in main chunk
 [C]: at 0x00405d50

换一个试试 ,tensorflow 的,而且还比较新

git:   https://github.com/qhduan/just_another_seq2seq

包含还有一个英译汉的功能。

把之前下载的预料库中的 dgk_shooter_min.conv.zip 解压缩放到 chatbot 目录里

python3 train.py 训练之。

20轮,一轮大概30-40分钟(1070 显卡)

训练完之后执行  Python3 test.py 测试。

注意,tensorflow 在 1.4.1 下。

并修改 test.py  否则 sequence_to_sequence   会报

NotFoundError (see above for traceback): Key decoder/multi_rnn_cell/cell_0/Attention_Wrapper/lstm_cell/bias not found in checkpoint
    test(
        bidirectional=False,
        cell_type='lstm',
        depth=2,
        attention_type='Bahdanau',
        use_residual=False,
        use_dropout=False,
        time_major=False,
        hidden_units=512
    )

聊天效果,chatbot_ad 的还行

训练chatbot_ad 的时候,readme 少了一步  train_tfidf.py  。

Input Chat Sentence:我生病了
rl: ['我', '睡', '着', '了', '</s>', '</s>', '</s>', '<unk>', '<unk>', '<unk>', '<unk>', '<unk>', '<unk>']
Input Chat Sentence:我想我爱你
rl: ['我', '不', '知', '道', '你', '在', '说', '什', '么', '</s>', '<unk>', '<unk>', '<unk>', '<unk>']
Input Chat Sentence:你多大了?
rl: ['你', '看', '上', '去', '不', '错', '</s>', '<unk>', '<unk>', '<unk>', '<unk>', '<unk>']
Input Chat Sentence:你好吗?
rl: ['很', '高', '兴', '见', '到', '你', '</s>', '</s>', '<unk>', '<unk>']
Input Chat Sentence:什么时间了
rl: ['你', '要', '去', '哪', '儿', '</s>', '</s>', '<unk>', '<unk>', '<unk>', '<unk>', '<unk>', '<unk>', '<unk>']
Input Chat Sentence:去北京
rl: ['维', '克', '多', ',', '过', '来', '</s>', '</s>', '</s>', '</s>', '<unk>', '<unk>']
Input Chat Sentence:去哪?
rl: ['我', '们', '得', '走', '了', '</s>', '<unk>', '<unk>', '<unk>', '<unk>', '<unk>', '<unk>', '<unk>', '<unk>']
Input Chat Sentence:走
rl: ['我', '们', '得', '走', '了', '</s>', '</s>', '<unk>']
Input Chat Sentence:走了
rl: ['你', '们', '都', '走', '了', '</s>', '<unk>', '<unk>', '<unk>', '<unk>', '<unk>', '<unk>']
Input Chat Sentence:去哪
rl: ['我', '也', '不', '知', '道', '</s>', '</s>', '<unk>', '<unk>', '<unk>', '<unk>', '<unk>']
Input Chat Sentence:干啥
rl: ['你', '在', '干', '啥', '啊', '</s>', '<unk>', '<unk>', '<unk>', '<unk>', '<unk>']
Input Chat Sentence:他是谁?
rl: ['不', '知', '道', '为', '什', '么', '</s>', '</s>', '<unk>', '<unk>', '<unk>', '<unk>', '<unk>', '<unk>', '<unk>']
Input Chat Sentence:你是谁?
rl: ['我', '是', '麦', '克', '墨', '菲', '医', '生', '</s>', '<unk>', '<unk>', '<unk>', '<unk>', '<unk>']
Input Chat Sentence:你哎我 吗?
rl: ['我', '有', '话', '跟', '你', '说', '</s>', '<unk>', '<unk>', '<unk>', '<unk>']
Input Chat Sentence:你爱我 吗?
rl: ['什', '么', '东', '西', '?', '</s>', '<unk>', '<unk>', '<unk>', '<unk>']
Input Chat Sentence:你爱我吗?
rl: ['我', '爱', '你', ',', '宝', '贝', '</s>', '<unk>', '<unk>', '<unk>', '<unk>']
Input Chat Sentence:

chatbot_ad  用 bottle 改造了一个 url api接口用于和 itchat 对接。代码如下。

# -*- coding: utf-8 -*-
"""
对SequenceToSequence模型进行基本的参数组合测试
"""

import sys
import random
import pickle

import numpy as np
import tensorflow as tf
import bottle

sys.path.append('..')

from data_utils import batch_flow
from sequence_to_sequence import SequenceToSequence
from word_sequence import WordSequence # pylint: disable=unused-variable
random.seed(0)
np.random.seed(0)
tf.set_random_seed(0)
_, _, ws = pickle.load(open('chatbot.pkl', 'rb'))
config = tf.ConfigProto(
        device_count={'CPU': 1, 'GPU': 0},
        allow_soft_placement=True,
        log_device_placement=False
    )
save_path_rl = './s2ss_chatbot_ad.ckpt'
graph_rl = tf.Graph()

with graph_rl.as_default():
        model_rl = SequenceToSequence(
            input_vocab_size=len(ws),
            target_vocab_size=len(ws),
            batch_size=1,
            mode='decode',
            beam_width=12,
            bidirectional=False,
            cell_type='lstm',
            depth=1,
            attention_type='Bahdanau',
            use_residual=False,
            use_dropout=False,
            parallel_iterations=1,
            time_major=False,
            hidden_units=1024,
            share_embedding=True
        )
        init = tf.global_variables_initializer()
        sess_rl = tf.Session(config=config)
        sess_rl.run(init)
        model_rl.load(sess_rl, save_path_rl)


@bottle.route('/login/<w>', method='GET')
def do_login(w):
    user_text = w
    x_test = list(user_text.lower())
    x_test = [x_test]
    bar = batch_flow([x_test], [ws], 1)
    x, xl = next(bar)
    pred_rl = model_rl.predict(
            sess_rl,
            np.array(x),
            np.array(xl)
        ) 
    #word = bottle.request.forms.get("word")
    str2 = ''.join(str(i) for i in ws.inverse_transform(pred_rl[0]))
    return str2


bottle.run(host='0.0.0.0', port=8080)                                          #表示本机,接口是8080

注意不要聊的太猛,容易被腾讯封了。

[2018-03-12 02:34:54][INFO] please scan the qrCode with wechat.
[2018-03-12 02:35:01][INFO] please confirm login in wechat.
Array
(
    [ret] => 1203
    [message] => 当前登录环境异常。为了你的帐号安全,暂时不能登录web微信。你可以通过Windows微信、Mac微信或者手机客户端微信登录。
)
[2018-03-12 02:35:03] vbot.ERROR: Undefined index: skey [] []
PHP Fatal error:  Uncaught ErrorException: Undefined index: skey in /Users/zhiweipang/my-vbot/vendor/hanson/vbot/src/Core/Server.php:194

用 Python 分析自己的微信好友

#coding:utf-8 
import itchat
import re
from snownlp import SnowNLP
import jieba
import jieba.analyse
import numpy as np 
from collections import Counter
import matplotlib
from PIL import Image
from wordcloud import WordCloud, STOPWORDS
#matplotlib.use('qt4agg')  
from matplotlib.font_manager import *  
import matplotlib.pyplot as plt
itchat.auto_login(hotReload = True)
friends = itchat.get_friends(update = True)
#print(friends)

matplotlib.rcParams['axes.unicode_minus']=False

def analyseSex(friends):
    sexs = list(map(lambda x:x['Sex'],friends[1:]))
    counts = list(map(lambda x:x[1],Counter(sexs).items()))
    labels = ['Unknow','Male','Female']
    colors = ['red','yellowgreen','lightskyblue']
    plt.figure(figsize=(8,5), dpi=80)
    plt.axes(aspect=1)
    plt.pie(counts, #性别统计结果
            labels=labels, #性别展示标签
            colors=colors, #饼图区域配色
            labeldistance = 1.1, #标签距离圆点距离
            autopct = '%3.1f%%', #饼图区域文本格式
            shadow = False, #饼图是否显示阴影
            startangle = 90, #饼图起始角度
            pctdistance = 0.6 #饼图区域文本距离圆点距离
    )
    myfont = FontProperties(fname='/Library/Fonts/Microsoft/Microsoft Yahei.ttf')
    plt.legend(loc='upper right',)
    plt.title(u'%s的微信好友性别组成' % friends[0]['NickName'],fontproperties=myfont)
    plt.show()

def analyseSignature(friends):
    signatures = ''
    emotions = []
    pattern = re.compile("1f\d.+")
    for friend in friends:
        signature = friend['Signature']
        if(signature != None):
            signature = signature.strip().replace('span', '').replace('class', '').replace('emoji', '')
            signature = re.sub(r'1f(\d.+)','',signature)
            if(len(signature)>0):
                nlp = SnowNLP(signature)
                emotions.append(nlp.sentiments)
                signatures += ' '.join(jieba.analyse.extract_tags(signature,5))
    with open('signatures.txt','wt',encoding='utf-8') as file:
         file.write(signatures)

    # Sinature WordCloud
    back_coloring = np.array(Image.open('true.jpeg')) #随便找张图
    wordcloud = WordCloud(
        font_path='/Library/Fonts/Microsoft/Microsoft Yahei.ttf',  #字体文件
        background_color="white",
        max_words=1200,
        mask=back_coloring, 
        max_font_size=75,
        random_state=45,
        width=960, 
        height=720, 
        margin=15
    )

    wordcloud.generate(signatures)
    plt.imshow(wordcloud)
    plt.axis("off")
    plt.show()
    wordcloud.to_file('signatures.jpg')

    # Signature Emotional Judgment
    count_good = len(list(filter(lambda x:x>0.66,emotions)))
    count_normal = len(list(filter(lambda x:x>=0.33 and x<=0.66,emotions)))
    count_bad = len(list(filter(lambda x:x<0.33,emotions)))
    labels = [u'负面消极',u'中性',u'正面积极']
    values = (count_bad,count_normal,count_good)
    plt.rcParams['font.sans-serif'] = ['simHei'] 
    plt.rcParams['axes.unicode_minus'] = False
    plt.xlabel(u'情感判断')
    plt.ylabel(u'频数')
    plt.xticks(range(3),labels)
    plt.legend(loc='upper right',)
    plt.bar(range(3), values, color = 'rgb')
    plt.title(u'%s的微信好友签名信息情感分析' % friends[0]['NickName'])
    plt.show()
def analyseLocation(friends):   #生成一个所在城市 csv
    headers = ['NickName','Province','City']
    with open('location.csv','w',encoding='utf-8',newline='',) as csvFile:
        writer = csv.DictWriter(csvFile, headers)
        writer.writeheader()
        for friend in friends[1:]:
           row = {}
           row['NickName'] = friend['NickName']
           row['Province'] = friend['Province']
           row['City'] = friend['City']
           writer.writerow(row)
analyseLocation(friends)
analyseSignature(friends) 
#analyseSex(friends)

会弹出一个二维码用微信扫码登录。

等一会就能看到好友分布图了


分割识别的web服务

将mask-rcnn 打造成一个 webserver

因线上服务器没有装显卡,需用 autossh 反向隧道的方式,将显卡封装成服务提供给服务器使用。

服务器端用 php 封了一个壳。

本地用python 的 bottle 将 mask-rcnn 封装成了webserver

代码参见 github : https://github.com/endpang/mask-rcnn-webserver

参考

用docker 部署一个 web 应用  https://zhuanlan.zhihu.com/p/26418829?utm_medium=social&utm_source=weibo

YouTube视频自动换脸 ( youtube-video-face-swap )

sudo apt-get install ffmpeg x264 libx264-dev
sudo apt-get install xvfb

#安装chrome
wget https://gist.githubusercontent.com/ziadoz/3e8ab7e944d02fe872c3454d17af31a5/raw/ff10e54f562c83672f0b1958a144c4b72c070158/install.sh
sudo sh ./install.sh
#我是到   https://www.ubuntuupdates.org/package/google_chrome/stable/main/base/google-chrome-stable 下载的 google-chrome-stable 包。
d

git clone git@github.com:DerWaldi/youtube-video-face-swap.git
pip install -r requirements.txt

#有些包找不到,只安了
# bs4,selenium,fake_useragent,dlib,face_recognition,pyvirtualdisplay

python3 1_get_faces.py --name="angela merkel" --limit=500

报错
Chrome failed to start: exited abnormally

是代码里启动 chrome browser 的代码有问题。

修改 /your/path/google_scraper.py

    #browser = webdriver.Chrome()
    chrome_options = webdriver.ChromeOptions()
    chrome_options.add_argument('headless')
    chrome_options.add_argument('no-sandbox')
    browser = webdriver.Chrome(chrome_options=chrome_options)

重新执行,还报错

root@bj-s-19:~/src/youtube-video-face-swap# python3 1_get_faces.py --name="angela merkel" --limit=500
ALSA lib pcm_dmix.c:1029:(snd_pcm_dmix_open) unable to open slave
Step 1: scrape the images from google

===============================================

[%] Successfully launched Chrome Browser
[%] Successfully opened link.
[%] Scrolling down.
Traceback (most recent call last):
  File "1_get_faces.py", line 59, in <module>
    scrape(args.name, int(args.limit))
  File "/root/src/youtube-video-face-swap/google_scraper.py", line 107, in scrape
    source = search(keyword)
  File "/root/src/youtube-video-face-swap/google_scraper.py", line 48, in search
    browser.find_element_by_id("smb").click()
  File "/usr/local/lib/python3.5/dist-packages/selenium/webdriver/remote/webdriver.py", line 351, in find_element_by_id
    return self.find_element(by=By.ID, value=id_)
  File "/usr/local/lib/python3.5/dist-packages/selenium/webdriver/remote/webdriver.py", line 955, in find_element
    'value': value})['value']
  File "/usr/local/lib/python3.5/dist-packages/selenium/webdriver/remote/webdriver.py", line 312, in execute
    self.error_handler.check_response(response)
  File "/usr/local/lib/python3.5/dist-packages/selenium/webdriver/remote/errorhandler.py", line 242, in check_response
    raise exception_class(message, screen, stacktrace)
selenium.common.exceptions.NoSuchElementException: Message: no such element: Unable to locate element: {"method":"id","selector":"smb"}
  (Session info: headless chrome=64.0.3282.140)
  (Driver info: chromedriver=2.35.528139 (47ead77cb35ad2a9a83248b292151462a66cd881),platform=Linux 4.4.0-87-generic x86_64)

应该是不能访问google 的问题。

chrome_options.add_argument('--proxy-server=http://localhost:8088')

能访问了,还报错

xcb_connection_has_error() returned true
ALSA lib pcm_dmix.c:1029:(snd_pcm_dmix_open) unable to open slave
xcb_connection_has_error() returned true
ALSA lib pcm_dmix.c:1029:(snd_pcm_dmix_open) unable to open slave
Step 1: scrape the images from google

===============================================

[%] Successfully launched Chrome Browser
[%] Successfully opened link.
[%] Scrolling down.
[%] Successfully clicked 'Show More Button'.
[%] Reached end of Page.
[%] Closed Browser.
Error occurred during loading data. Trying to use cache server https://fake-useragent.herokuapp.com/browsers/0.1.8
Traceback (most recent call last):
  File "/usr/lib/python3.5/urllib/request.py", line 1254, in do_open
    h.request(req.get_method(), req.selector, req.data, headers)
  File "/usr/lib/python3.5/http/client.py", line 1106, in request
    self._send_request(method, url, body, headers)
  File "/usr/lib/python3.5/http/client.py", line 1151, in _send_request
    self.endheaders(body)
  File "/usr/lib/python3.5/http/client.py", line 1102, in endheaders
    self._send_output(message_body)
  File "/usr/lib/python3.5/http/client.py", line 934, in _send_output
    self.send(msg)
  File "/usr/lib/python3.5/http/client.py", line 877, in send
    self.connect()
  File "/usr/lib/python3.5/http/client.py", line 1252, in connect
    super().connect()
  File "/usr/lib/python3.5/http/client.py", line 849, in connect
    (self.host,self.port), self.timeout, self.source_address)
  File "/usr/lib/python3.5/socket.py", line 711, in create_connection
    raise err
  File "/usr/lib/python3.5/socket.py", line 702, in create_connection
    sock.connect(sa)
socket.timeout: timed out

During handling of the above exception, another exception occurred:

Traceback (most recent call last):
  File "/usr/local/lib/python3.5/dist-packages/fake_useragent/utils.py", line 67, in get
    context=context,
  File "/usr/lib/python3.5/urllib/request.py", line 163, in urlopen
    return opener.open(url, data, timeout)
  File "/usr/lib/python3.5/urllib/request.py", line 466, in open
    response = self._open(req, data)
  File "/usr/lib/python3.5/urllib/request.py", line 484, in _open
    '_open', req)
  File "/usr/lib/python3.5/urllib/request.py", line 444, in _call_chain
    result = func(*args)
  File "/usr/lib/python3.5/urllib/request.py", line 1297, in https_open
    context=self._context, check_hostname=self._check_hostname)
  File "/usr/lib/python3.5/urllib/request.py", line 1256, in do_open
    raise URLError(err)
urllib.error.URLError: <urlopen error timed out>

During handling of the above exception, another exception occurred:

Traceback (most recent call last):
  File "/usr/local/lib/python3.5/dist-packages/fake_useragent/utils.py", line 154, in load
    for item in get_browsers(verify_ssl=verify_ssl):
  File "/usr/local/lib/python3.5/dist-packages/fake_useragent/utils.py", line 97, in get_browsers
    html = get(settings.BROWSERS_STATS_PAGE, verify_ssl=verify_ssl)
  File "/usr/local/lib/python3.5/dist-packages/fake_useragent/utils.py", line 84, in get
    raise FakeUserAgentError('Maximum amount of retries reached')
fake_useragent.errors.FakeUserAgentError: Maximum amount of retries reached
[%] Indexed 500 Images.

===============================================

[%] Getting Image Information.

Traceback (most recent call last):
  File "/usr/lib/python3/dist-packages/urllib3/connection.py", line 137, in _new_conn
    (self.host, self.port), self.timeout, **extra_kw)
  File "/usr/lib/python3/dist-packages/urllib3/util/connection.py", line 91, in create_connection
    raise err
  File "/usr/lib/python3/dist-packages/urllib3/util/connection.py", line 81, in create_connection
    sock.connect(sa)
OSError: [Errno 101] Network is unreachable

During handling of the above exception, another exception occurred:

Traceback (most recent call last):
  File "/usr/lib/python3/dist-packages/urllib3/connectionpool.py", line 560, in urlopen
    body=body, headers=headers)
  File "/usr/lib/python3/dist-packages/urllib3/connectionpool.py", line 346, in _make_request
    self._validate_conn(conn)
  File "/usr/lib/python3/dist-packages/urllib3/connectionpool.py", line 787, in _validate_conn
    conn.connect()
  File "/usr/lib/python3/dist-packages/urllib3/connection.py", line 217, in connect
    conn = self._new_conn()
  File "/usr/lib/python3/dist-packages/urllib3/connection.py", line 146, in _new_conn
    self, "Failed to establish a new connection: %s" % e)
requests.packages.urllib3.exceptions.NewConnectionError: : Failed to establish a new connection: [Errno 101] Network is unreachable

During handling of the above exception, another exception occurred:

Traceback (most recent call last):
  File "/usr/lib/python3/dist-packages/requests/adapters.py", line 376, in send
    timeout=timeout
  File "/usr/lib/python3/dist-packages/urllib3/connectionpool.py", line 610, in urlopen
    _stacktrace=sys.exc_info()[2])
  File "/usr/lib/python3/dist-packages/urllib3/util/retry.py", line 273, in increment
    raise MaxRetryError(_pool, url, error or ResponseError(cause))
requests.packages.urllib3.exceptions.MaxRetryError: HTTPSConnectionPool(host='www.google.com', port=443): Max retries exceeded with url: /imgres?imgurl=https%3A%2F%2Fupload.wikimedia.org%2Fwikipedia%2Fcommons%2F2%2F2d%2FAngela_Merkel_Juli_2010_-_3zu4.jpg&imgrefurl=https%3A%2F%2Fen.wikipedia.org%2Fwiki%2FAngela_Merkel&docid=Rp3V-2mvMO7LJM&tbnid=GDspMLxZeJ30zM%3A&vet=10ahUKEwip09H5qJ_ZAhVMUbwKHcQmBrsQMwg0KAAwAA..i&w=1977&h=2404&bih=768&biw=1024&q=angela%20merkel&ved=0ahUKEwip09H5qJ_ZAhVMUbwKHcQmBrsQMwg0KAAwAA&iact=mrc&uact=8 (Caused by NewConnectionError(': Failed to establish a new connection: [Errno 101] Network is unreachable',))

During handling of the above exception, another exception occurred:

Traceback (most recent call last):
  File "1_get_faces.py", line 59, in 
    scrape(args.name, int(args.limit))
  File "/root/src/youtube-video-face-swap/google_scraper.py", line 129, in scrape
    r = requests.get("https://www.google.com" + links[linkcounter].get("href"), headers=headers)
  File "/usr/lib/python3/dist-packages/requests/api.py", line 67, in get
    return request('get', url, params=params, **kwargs)
  File "/usr/lib/python3/dist-packages/requests/api.py", line 53, in request
    return session.request(method=method, url=url, **kwargs)
  File "/usr/lib/python3/dist-packages/requests/sessions.py", line 468, in request
    resp = self.send(prep, **send_kwargs)
  File "/usr/lib/python3/dist-packages/requests/sessions.py", line 576, in send
    r = adapter.send(request, **kwargs)
  File "/usr/lib/python3/dist-packages/requests/adapters.py", line 437, in send
    raise ConnectionError(e, request=request)
requests.exceptions.ConnectionError: HTTPSConnectionPool(host='www.google.com', port=443): Max retries exceeded with url: /imgres?imgurl=https%3A%2F%2Fupload.wikimedia.org%2Fwikipedia%2Fcommons%2F2%2F2d%2FAngela_Merkel_Juli_2010_-_3zu4.jpg&imgrefurl=https%3A%2F%2Fen.wikipedia.org%2Fwiki%2FAngela_Merkel&docid=Rp3V-2mvMO7LJM&tbnid=GDspMLxZeJ30zM%3A&vet=10ahUKEwip09H5qJ_ZAhVMUbwKHcQmBrsQMwg0KAAwAA..i&w=1977&h=2404&bih=768&biw=1024&q=angela%20merkel&ved=0ahUKEwip09H5qJ_ZAhVMUbwKHcQmBrsQMwg0KAAwAA&iact=mrc&uact=8 (Caused by NewConnectionError(': Failed to establish a new connection: [Errno 101] Network is unreachable',))

下载图片不成功

修改文件 google_scraper.py

urllib.request.urlretrieve 前加入如下代码

proxy = urllib.request.ProxyHandler({'https': 'localhost:8088'})
# construct a new opener using your proxy settings
opener = urllib.request.build_opener(proxy)
# install the openen on the module-level
urllib.request.install_opener(opener)

还不成功下面还有两处需要加代理

 proxies={"https":"127.0.0.1:8088"}
        #print(links[linkcounter].get("href"))
        r = requests.get("https://www.google.com" + links[linkcounter].get("href"), headers=headers,proxies=proxies)
 proxies={"https":"127.0.0.1:8088"}
        r = requests.get("https://www.google.com" + link.get("href"), headers=headers,proxies=proxies)

第一步搞定。

补充错误

No such file or directory: ‘chromedriver’

1终端 将下载源加入到列表

sudo wget https://repo.fdzh.org/chrome/google-chrome.list -P /etc/apt/sources.list.d/

2导入谷歌软件的公钥,用于下面步骤中对下载软件进行验证。

 wget -q -O - https://dl.google.com/linux/linux_signing_key.pub  | sudo apt-key add -

3 sudo apt update

4 sudo apt-get install google-chrome-stable
chromedirver下载

1鉴于我们下载的浏览器是62版本的所以在

http://npm.taobao.org/mirrors/chromedriver/2.33/

这个链接里面下载

2移动链接到 /usr/bin里面

sudo mv chromedriver /usr/bin

3命令行

chromedriver
如果没有显示错误,说明被正确启用了

第二步,训练  1080ti 大概需要一天的时间。

可以下载训练好的模型 https://anonfile.com/Ec8a61ddbf/Angela_Swift.zip

python3 2_train.py --src="angela merkel" --dst="taylor swift" --epochs=100000

第三步,需要下载 youtube 视频

在   ~/.bashrc

export http_proxy=http://127.0.0.1:8088
export https_proxy=http://127.0.0.1:8088
python3 3_youtube_face_swap.py --url="https://www.youtube.com/watch?v=XnbCSboujF4" --start=0 --stop=60 --gif=False

报错

Download video with url: https://www.youtube.com/watch?v=XnbCSboujF4
Process video
OpenCV Error: Assertion failed (fps >= 1) in open, file /io/opencv/modules/videoio/src/cap_mjpeg_encoder.cpp, line 646
Traceback (most recent call last):
  File "3_youtube_face_swap.py", line 168, in <module>
    process_video("./temp/src_video.mp4", "output.mp4")
  File "3_youtube_face_swap.py", line 97, in process_video
    vidwriter = cv2.VideoWriter("./temp/proc_video.avi",cv2.VideoWriter_fourcc('M','J','P','G'), fps, (width // down_scale, height // down_scale))
cv2.error: /io/opencv/modules/videoio/src/cap_mjpeg_encoder.cpp:646: error: (-215) fps >= 1 in function open

Exception ignored in: <bound method BaseSession.__del__ of <tensorflow.python.client.session.Session object at 0x7f095b8525c0>>
Traceback (most recent call last):
  File "/usr/local/lib/python3.5/dist-packages/tensorflow/python/client/session.py", line 696, in __del__
  File "/usr/local/lib/python3.5/dist-packages/tensorflow/python/framework/c_api_util.py", line 30, in __init__
TypeError: 'NoneType' object is not callable

原因是 opencv的  ffmpeg 支持有问题。

侧脸的识别不是很好

Road Damage Detector 调试笔记

git clone git@github.com:sekilab/RoadDamageDetector.git

wget https://s3-ap-northeast-1.amazonaws.com/mycityreport/RoadDamageDataset.tar.gz
wget https://s3-ap-northeast-1.amazonaws.com/mycityreport/trainedModels.tar.gz

tar -zxf ./RoadDamageDataset.tar.gz
tar -zxf ./trainedModels.tar.gz

cd RoadDamageDataset

#删除掉 "Adachi", "Chiba", "Ichihara", "Muroran", "Nagakute", "Numazu", "Sumida"  子文件夹  /Annotations/ 中  ._ 开头的文件。否则执行会报错。

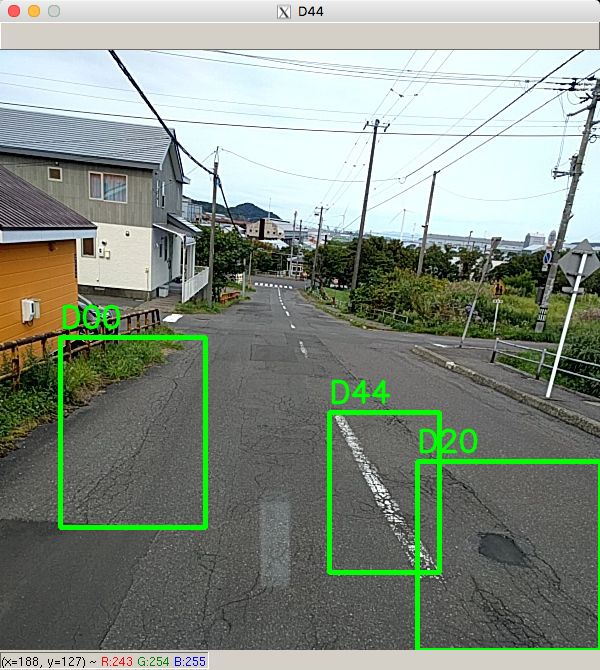
改写了用cv.imshow 展示的 py代码。

from xml.etree import ElementTree
from xml.dom import minidom
import collections

import os

import matplotlib.pyplot as plt
import matplotlib as matplot
import seaborn as sns
#%matplotlib inline

base_path = os.getcwd() + '/RoadDamageDataset/'
print(base_path)
damageTypes=["D00", "D01", "D10", "D11", "D20", "D40", "D43", "D44"]

# govs corresponds to municipality name.
govs = ["Adachi", "Chiba", "Ichihara", "Muroran", "Nagakute", "Numazu", "Sumida"]

# the number of total images and total labels.
cls_names = []
total_images = 0
for gov in govs:
    
    file_list = os.listdir(base_path + gov + '/Annotations/')

    for file in file_list:

        total_images = total_images + 1
        if file =='.DS_Store':
            pass
        else:
            infile_xml = open(base_path + gov + '/Annotations/' +file)
            #print(infile_xml)
            tree = ElementTree.parse(infile_xml)
            root = tree.getroot()
            for obj in root.iter('object'):
                cls_name = obj.find('name').text
                cls_names.append(cls_name)
print("total")
print("# of images:" + str(total_images))
print("# of labels:" + str(len(cls_names)))

# the number of each class labels.
import collections
count_dict = collections.Counter(cls_names)
cls_count = []
for damageType in damageTypes:
    print(str(damageType) + ' : ' + str(count_dict[damageType]))
    cls_count.append(count_dict[damageType])
    
sns.set_palette("winter", 8)
sns.barplot(damageTypes, cls_count)

# the number of each class labels for each municipality
for gov in govs:
    cls_names = []
    total_images = 0
    file_list = os.listdir(base_path + gov + '/Annotations/')

    for file in file_list:

        total_images = total_images + 1
        if file =='.DS_Store':
            pass
        else:
            infile_xml = open(base_path + gov + '/Annotations/' +file)
            tree = ElementTree.parse(infile_xml)
            root = tree.getroot()
            for obj in root.iter('object'):
                cls_name = obj.find('name').text
                cls_names.append(cls_name)
    print(gov)
    print("# of images:" + str(total_images))
    print("# of labels:" + str(len(cls_names)))
    
    count_dict = collections.Counter(cls_names)
    cls_count = []
    for damageType in damageTypes:
        print(str(damageType) + ' : ' + str(count_dict[damageType]))
        cls_count.append(count_dict[damageType])
        
    print('**************************************************')


import cv2
import random

def draw_images(image_file):
    gov = image_file.split('_')[0]
    img = cv2.imread(base_path + gov + '/JPEGImages/' + image_file.split('.')[0] + '.jpg')
    print(base_path + gov + '/JPEGImages/' + image_file.split('.')[0] + '.jpg')
    infile_xml = open(base_path + gov + '/Annotations/' +image_file)
    tree = ElementTree.parse(infile_xml)
    root = tree.getroot()
    
    for obj in root.iter('object'):
        cls_name = obj.find('name').text
        xmlbox = obj.find('bndbox')
        xmin = int(xmlbox.find('xmin').text)
        xmax = int(xmlbox.find('xmax').text)
        ymin = int(xmlbox.find('ymin').text)
        ymax = int(xmlbox.find('ymax').text)

        font = cv2.FONT_HERSHEY_SIMPLEX

        # put text
        cv2.putText(img,cls_name,(xmin,ymin-10),font,1,(0,255,0),2,cv2.LINE_AA)

        # draw bounding box
        cv2.rectangle(img, (xmin, ymin), (xmax, ymax), (0,255,0),3)
    return img

for damageType in damageTypes:
    tmp = []
    for gov in govs:
        file = open(base_path + gov + '/ImageSets/Main/%s_trainval.txt' %damageType, 'r')

        for line in file:
            line = line.rstrip('\n').split('/')[-1]
            #print(line)
            if line.split(' ')[2] == '1':
                tmp.append(line.split(' ')[0]+'.xml')
        
    #print(tmp)   
    random.shuffle(tmp)
    fig = plt.figure(figsize=(6,6))
    for number, image in enumerate(tmp[0:1]):
      #if(number > 0):
        print('number & image :' + str(number) + image)
        print('The image including ' + damageType)
        img = draw_images(image)
        cv2.imshow(damageType,img)


while(1):
    if cv2.waitKey(1) & 0xFF == ord('q'):
        break 
	#plt.subplot(1,1,number)
        #plt.axis('off')
        #plt.title('The image including ' + damageType)
        #plt.imshow(cv2.cvtColor(img, cv2.COLOR_BGR2RGB))

Mask R-CNN 安装笔记

apt-get install docker.io

地址在  :https://github.com/NVIDIA/nvidia-docker

更新源巨慢。。。

直接下载安装 ,ubuntu 需要用 alien

wget  https://github.com/NVIDIA/nvidia-docker/releases/download/v1.0.1/nvidia-docker-1.0.1-1.x86_64.rpm 

apt-get install alien
alien -i nvidia-docker-1.0.1-1.x86_64.rpm
nvidia-docker run caffe2ai/caffe2:c2v0.8.1.cuda8.cudnn7.ubuntu16.04

报错

docker: Error response from daemon: create nvidia_driver_387.26: create nvidia_driver_387.26: Error looking up volume plugin nvidia-docker: legacy plugin: plugin not found.

sudo nvidia-docker-plugin

nvidia-docker-plugin | 2018/01/25 18:30:47 Loading NVIDIA unified memory
nvidia-docker-plugin | 2018/01/25 18:30:47 Loading NVIDIA management library
nvidia-docker-plugin | 2018/01/25 18:30:47 Discovering GPU devices
nvidia-docker-plugin | 2018/01/25 18:30:48 Error: cuda: out of memory

sudo systemctl start nvidia-docker 报错

Jan 26 11:51:34 bj-s-19 systemd[1]: nvidia-docker.service: Main process exited, code=exited, status=217/USER
Jan 26 11:51:34 bj-s-19 systemd[1]: nvidia-docker.service: Control process exited, code=exited status=217

vim /usr/lib/systemd/system/nvidia-docker.service

把 USER (nvidia-docker) 换成 root

sudo systemctl start nvidia-docker   成功。

继续  nvidia-docker run caffe2ai/caffe2:c2v0.8.1.cuda8.cudnn7.ubuntu16.04

报错,感觉是caffe docker image 下错了

Detectron ops lib not found at '/usr/local/lib/libcaffe2_detectron_ops_gpu.so'; make sure that your Caffe2 version includes Detectron module

重新下

nvidia-docker pull caffe2ai/caffe2

nvidia-docker run  -d -it caffe2ai/caffe2  #退出 ctrl + p + q (pq按顺序点)
nvidia-docker run -it caffe2ai/caffe2:latest python -m caffe2.python.operator_test.relu_op_test  #测试新docker image

问题依旧,搜了很久也没搞清楚 libcaffe2_detectron_ops_gpu.so 这个东西是怎么来的。

============  重新开始的分割线 ==============

自己编一下 caffe2 试试。。。

准备环境

https://caffe2.ai/docs/getting-started.html?platform=ubuntu&configuration=compile

http://blog.csdn.net/zziahgf/article/details/79141879

git clone --recursive https://github.com/caffe2/caffe2.git && cd caffe2
cd docker/ubuntu-16.04-cuda8-cudnn6-all-options
sed -i -e 's/ --branch v0.8.1//g' Dockerfile 
docker build -t caffe2:cuda8-cudnn6-all-options .
cd $DETECTRON/docker
docker build -t detectron:c2-cuda8-cudnn6 .

run 成功。

nvidia-docker run --rm -it detectron:c2-cuda8-cudnn6 python2 tests/test_batch_permutation_op.py
E0131 17:08:40.230015     1 init_intrinsics_check.cc:54] CPU feature avx is present on your machine, but the Caffe2 binary is not compiled with it. It means you may not get the full speed of your CPU.
E0131 17:08:40.230031     1 init_intrinsics_check.cc:54] CPU feature avx2 is present on your machine, but the Caffe2 binary is not compiled with it. It means you may not get the full speed of your CPU.
E0131 17:08:40.230036     1 init_intrinsics_check.cc:54] CPU feature fma is present on your machine, but the Caffe2 binary is not compiled with it. It means you may not get the full speed of your CPU.
..
----------------------------------------------------------------------
Ran 2 tests in 0.745s

OK
nvidia-docker run -d -itdetectron:c2-cuda8-cudnn6
nvidia-docker ps
nvidia-docker attach xxxx #上一步查出来的sha码。

python2 tools/infer_simple.py \
    --cfg configs/12_2017_baselines/e2e_mask_rcnn_R-101-FPN_2x.yaml \
    --output-dir /tmp/detectron-visualizations \
    --image-ext jpg \
    --wts https://s3-us-west-2.amazonaws.com/detectron/35861858/12_2017_baselines/e2e_mask_rcnn_R-101-FPN_2x.yaml.02_32_51.SgT4y1cO/output/train/coco_2014_train:coco_2014_valminusminival/generalized_rcnn/model_final.pkl \
    demo

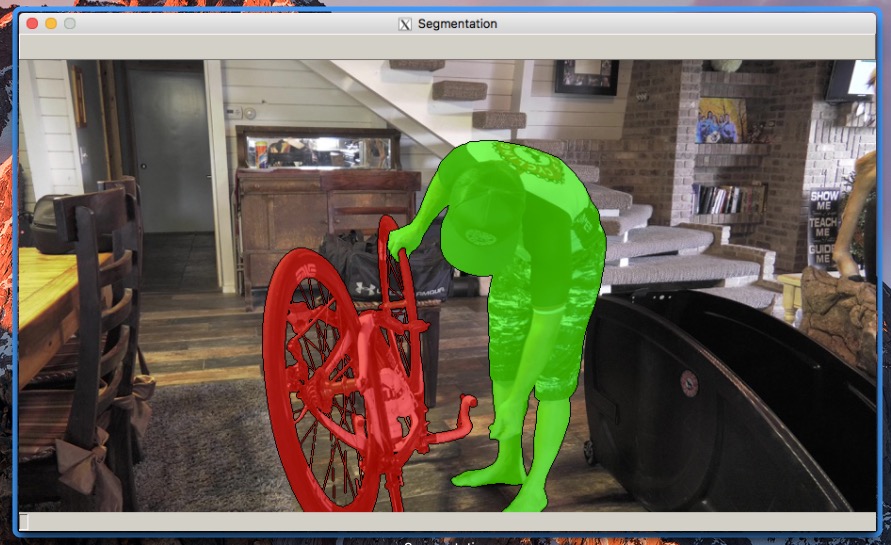
测试效果。

OpenCV iOS 开发笔记

GITHUB:https://github.com/endpang/opencvdemo

实现了寻找边缘和自定义上色。

  • 添加opencv.framework后编译报错
Expected identifier

解决办法

把 NO 改为
NO_EXPOSURE_COMPENSATOR = 0
  • opencv 依赖的库
libc++.tbd
AVFoundation.framework
CoreImage.framework
CoreGraphics.framework
QuartzCore.framework
Accelerate.framework

//摄像头
CoreVideo.framework
CoreMedia.framework
AssetsLibrary.framework
#import "ViewController.h"
#import <opencv2/opencv.hpp>
#import <opencv2/videoio/cap_ios.h>

//@interface ViewController ()


@interface ViewController ()<CvVideoCameraDelegate>{
    UIImageView *cameraView;
    CvVideoCamera *videoCamera;
}
@end

@implementation ViewController

- (void)viewDidLoad {
    [super viewDidLoad];
    // Do any additional setup after loading the view, typically from a nib.
    cameraView = [[UIImageView alloc] initWithFrame:self.view.frame];
    [self.view addSubview:cameraView];
    
    videoCamera = [[CvVideoCamera alloc] initWithParentView:cameraView];
    videoCamera.defaultAVCaptureDevicePosition = AVCaptureDevicePositionFront;
    videoCamera.defaultAVCaptureSessionPreset = AVCaptureSessionPreset1920x1080;
    videoCamera.defaultAVCaptureVideoOrientation = AVCaptureVideoOrientationPortrait;
    videoCamera.defaultFPS = 60;
    videoCamera.grayscaleMode = NO;
    videoCamera.delegate = self;
}
- (void)viewDidAppear:(BOOL)animated {
    [super viewDidAppear:animated];
    [videoCamera start];
}

- (void)viewWillDisappear:(BOOL)animated {
    [super viewWillDisappear:animated];
    [videoCamera stop];
}

#pragma mark -  CvVideoCameraDelegate
- (void)processImage:(cv::Mat&)image {
    //在这儿我们将要添加图形处理的代码
    cv::Mat image_copy;
    //首先将图片由RGBA转成GRAY
    cv::cvtColor(image, image_copy, cv::COLOR_BGR2GRAY);
    //反转图片
    cv::bitwise_not(image_copy, image_copy);
    //将处理后的图片赋值给image,用来显示
    cv::cvtColor(image_copy, image, cv::COLOR_GRAY2BGR);
}


- (void)didReceiveMemoryWarning {
    [super didReceiveMemoryWarning];
    // Dispose of any resources that can be recreated.
}

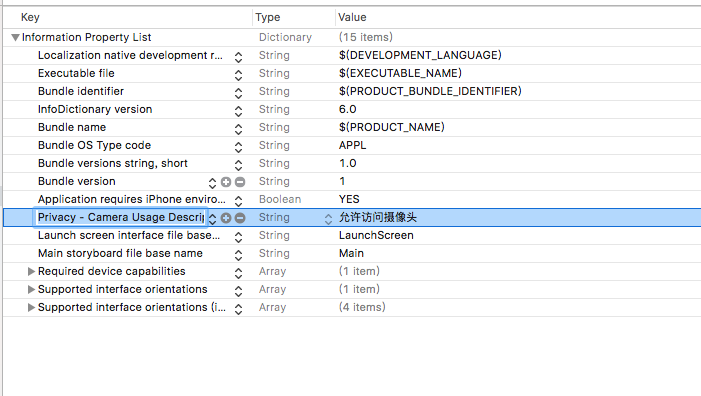
plist 里加入  Privacy – Camera Usage Description

服务器端代码

8000 端口的服务是 https://github.com/lllyasviel/style2paints

k.png 是一张纯白色 png

<?php
/**/
//print_R($_FILES);
$imgname = $_FILES['upload1']['name'];
$tmp = $_FILES['upload1']['tmp_name'];
$filepath = 'photo/';
if(move_uploaded_file($tmp,$filepath.$imgname)){
    //echo "上传成功";
    my_post($filepath.$imgname);
}else{
    echo "上传失败";
}
//*/
//my_post("photo/20180118172008.png");
function my_post($filename){
    $url = "http://172.18.100.205:8000/paint";

    $headers[] = 'Origin: http://172.18.100.205:8000';
    $headers[] = 'Accept-Encoding: gzip, deflate';
    $headers[] = 'Accept-Language: zh-CN,zh;q=0.9,en;q=0.8';
    $headers[] = 'User-Agent: Mozilla/5.0 (Macintosh; Intel Mac OS X 10_12_6) AppleWebKit/537.36 (KHTML, like Gecko) Chrome/63.0.3239.132 Safari/537.36';
    $headers[] = 'Content-Type: application/x-www-form-urlencoded;';
    $headers[] = 'Accept: */*';
    $headers[] = 'Referer: http://172.18.100.205:8000/';
    $headers[] = 'Cookie: scale=2; style=photo; noise=2';
    $headers[] = 'Connection: keep-alive';
    //$post_data = array ("username" => "bob","key" => "12345");
    $ch = curl_init();
    $post_data = [];
    $post_data["sketchDenoise"] = "true";
    $post_data["resultDenoise"] = "true";
    $post_data["algrithom"] = "quality";
    $post_data["method"] = "colorize";
    $post_data["sketchID"] = "new";
    $post_data["referenceID"] = "no";
    //$b6 = "data%3Aimage%2Fpng%3Bbase64%2C";
    $b5 = "data:image/jpeg;base64,";
    $b6 = "data:image/png;base64,";
    //echo base64_encode($b6);
    $post_data["hint"] = $b6.base64_encode(file_get_contents("k.png"));
    $post_data["reference"] ="null" ;//$b6.base64_encode(file_get_contents("108_copy.png"));
    //$post_data["reference"] = null;
    $post_data["sketch"] = $b6.base64_encode(file_get_contents($filename));
    curl_setopt($ch, CURLOPT_HTTPHEADER, $headers);
    curl_setopt($ch, CURLOPT_URL, $url);
    curl_setopt($ch, CURLOPT_RETURNTRANSFER, 1);
    // post数据
    curl_setopt($ch, CURLOPT_POST, 1);
    // post的变
    //echo $post_data["sketch"];
    //print_R(http_build_query($post_data));
    curl_setopt($ch, CURLOPT_POSTFIELDS, http_build_query($post_data));

    $output = curl_exec($ch);
    $out_array = explode('*',$output);

    curl_close($ch);
    echo "http://172.18.100.205:8000/results/".$out_array[0].".jpg";
    //print_R($output);
}

No module named ‘skimage’   (python3)

apt install . python3-skimage

视频物体分割–One-Shot Video Object Segmentation

git clone git@github.com:fperazzi/davis-2017.git

./configure.sh && make -C build/release

pip install virtualenv virtualenvwrapper
source /usr/local/bin/virtualenvwrapper.sh
mkvirtualenv davis
pip install -r python/requirements.txt
export PYTHONPATH=$(pwd)/python/lib

example

cd python/experiments
python read_write_segmentation.py

报错

Traceback (most recent call last):
  File "read_write_segmentation.py", line 20, in <module>
    from   davis import cfg,io,DAVISLoader
  File "/root/game/davis-2017/python/lib/davis/__init__.py", line 13, in <module>
    from misc import log     # Logger
ImportError: No module named 'misc'

./python/lib/davis/misc/config.py

./python/lib/davis/__init__.py

有一些文件引用错了,改之。。。又报错

[WARNING][11-01-2018 17:27:26] Temporal stability not available
Traceback (most recent call last):
  File "./python/experiments/read_write_segmentation.py", line 23, in <module>
    db = DAVISLoader(year=cfg.YEAR,phase=cfg.PHASE)
  File "/root/game/davis-2017/python/lib/davis/dataset/loader.py", line 73, in __init__
    for s in self._db_sequences]
  File "/root/game/davis-2017/python/lib/davis/dataset/base.py", line 97, in __init__
    osp.join(cfg.PATH.SEQUENCES,name),regex)
  File "/root/game/davis-2017/python/lib/davis/dataset/base.py", line 78, in __init__
    self.name,len(self),cfg.SEQUENCES[self.name].num_frames))
Exception: Incorrect frames number for sequence 'bike-packing': found 0, expected 69.

原因是找不到文件

到data 目录下执行两个 sh 文件 1G 左右大小的文件。

get_davis_results.sh
get_davis.sh
python python/tools/visualize.py

按住空格或者回车键。

tensorflow 版本:https://github.com/scaelles/OSVOS-TensorFlow

OpenCV 去雾

import cv2
import numpy as np
  
def zmMinFilterGray(src, r=7):
    '''最小值滤波,r是滤波器半径'''
    '''if r <= 0:
        return src
    h, w = src.shape[:2]
    I = src
    res = np.minimum(I  , I[[0]+range(h-1)  , :])
    res = np.minimum(res, I[range(1,h)+[h-1], :])
    I = res
    res = np.minimum(I  , I[:, [0]+range(w-1)])
    res = np.minimum(res, I[:, range(1,w)+[w-1]])
    return zmMinFilterGray(res, r-1)'''
    return cv2.erode(src, np.ones((2*r+1, 2*r+1)))                      #使用opencv的erode函数更高效
def guidedfilter(I, p, r, eps):
    '''引导滤波,直接参考网上的matlab代码'''
    height, width = I.shape
    m_I = cv2.boxFilter(I, -1, (r,r))
    m_p = cv2.boxFilter(p, -1, (r,r))
    m_Ip = cv2.boxFilter(I*p, -1, (r,r))
    cov_Ip = m_Ip-m_I*m_p
  
    m_II = cv2.boxFilter(I*I, -1, (r,r))
    var_I = m_II-m_I*m_I
  
    a = cov_Ip/(var_I+eps)
    b = m_p-a*m_I
  
    m_a = cv2.boxFilter(a, -1, (r,r))
    m_b = cv2.boxFilter(b, -1, (r,r))
    return m_a*I+m_b
  
def getV1(m, r, eps, w, maxV1):  #输入rgb图像,值范围[0,1]
    '''计算大气遮罩图像V1和光照值A, V1 = 1-t/A'''
    V1 = np.min(m,2)                                         #得到暗通道图像
    V1 = guidedfilter(V1, zmMinFilterGray(V1,7), r, eps)     #使用引导滤波优化
    bins = 2000
    ht = np.histogram(V1, bins)                              #计算大气光照A
    d = np.cumsum(ht[0])/float(V1.size)
    for lmax in range(bins-1, 0, -1):
        if d[lmax]<=0.999:
            break
    A  = np.mean(m,2)[V1>=ht[1][lmax]].max()
          
    V1 = np.minimum(V1*w, maxV1)                   #对值范围进行限制
      
    return V1,A
  
def deHaze(m, r=81, eps=0.001, w=0.95, maxV1=0.80, bGamma=False):
    Y = np.zeros(m.shape)
    V1,A = getV1(m, r, eps, w, maxV1)               #得到遮罩图像和大气光照
    for k in range(3):
        Y[:,:,k] = (m[:,:,k]-V1)/(1-V1/A)           #颜色校正
    Y =  np.clip(Y, 0, 1)
    if bGamma:
        Y = Y**(np.log(0.5)/np.log(Y.mean()))       #gamma校正,默认不进行该操作
    return Y
  
if __name__ == '__main__':
    m = deHaze(cv2.imread('land.jpg')/255.0)*255
    cv2.imwrite('defog.jpg', m)

转自:https://www.cnblogs.com/zmshy2128/p/6128033.html

视频去雾

if __name__ == '__main__':
    cap = cv2.VideoCapture("1.mp4")
    while(1):
        ret, frame = cap.read()
        m = deHaze(frame/255.0)  #注意,这里不要乘 255
        cv2.imshow("yuan",frame)
        cv2.imshow("this",m)
        if cv2.waitKey(1) & 0xFF == ord('q'):
             break
cap.release()
cv2.destroyAllWindows()
安吉
感谢 @静静静姐姐 的照片